
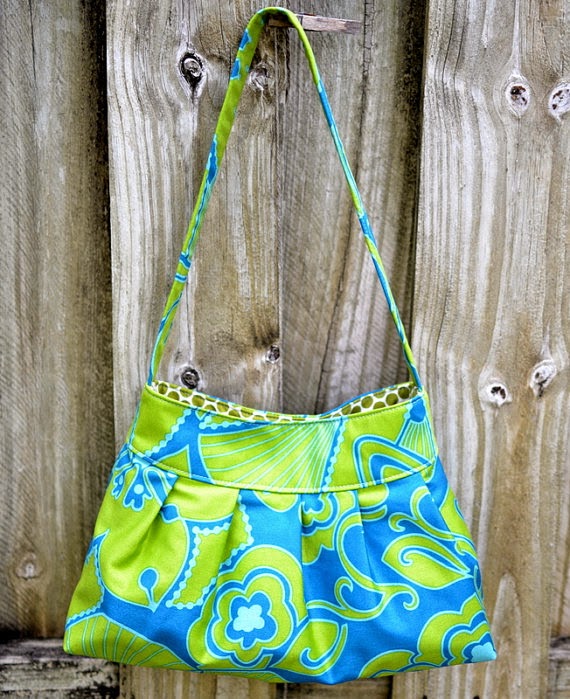
Introducing my first Handbag tutorial for how to make a lovely little Pleated Bag with a roomy, boxy bottom to help it stand up all on it's own.

So here it is to share with you all. Let me know if you make one, I'd love to see it!
The finished dimensions are...
8 in. tall, 12 in. wide across the bottom, and 4 in. deep.
Handle- 22 1/2 inches.

You will need:
a magnetic clasp
medium-weight interfacing
fusible fleece interfacing (or quarter inch quilt batting),
fabric.
note: If you are using Decorator weight fabric you will not need medium weight interfacing. My lining fabric is 100% quilt weight cotton, and the brown fabric is a very thin polyester type.
To start with, cut...
- 18 in. square of main fabric and medium weight interfacing.
- 18 in. square of lining fabric and fusible fleece
- 24" X 4 1/2" of strap fabric
- 24" X 4 1/2" of fusible fleece
- 8" X 9" pocket fabric.
Take the main fabric square and pin or baste it to the med-weight interfacing. From here on out treat these pieces as one. Make the Pleats on two opposite sides of the square.


Once you have two rows of pleats, use one of them to make a pattern for the yolk of the bag. To make the pattern, lay the pleated edge on a large piece of paper and trace the curve.

Use a ruler to mark another line 3 inches away, and then connect the dots.

Cut out the shape and fold it in half to make sure it is equal on each side.

- 2 from a coordinating fabric,
- 2 from Med-weight interfacing, if necessary
- 2 from lining fabric,
- 2 from fleece or batting.


To make the boxed bottom...


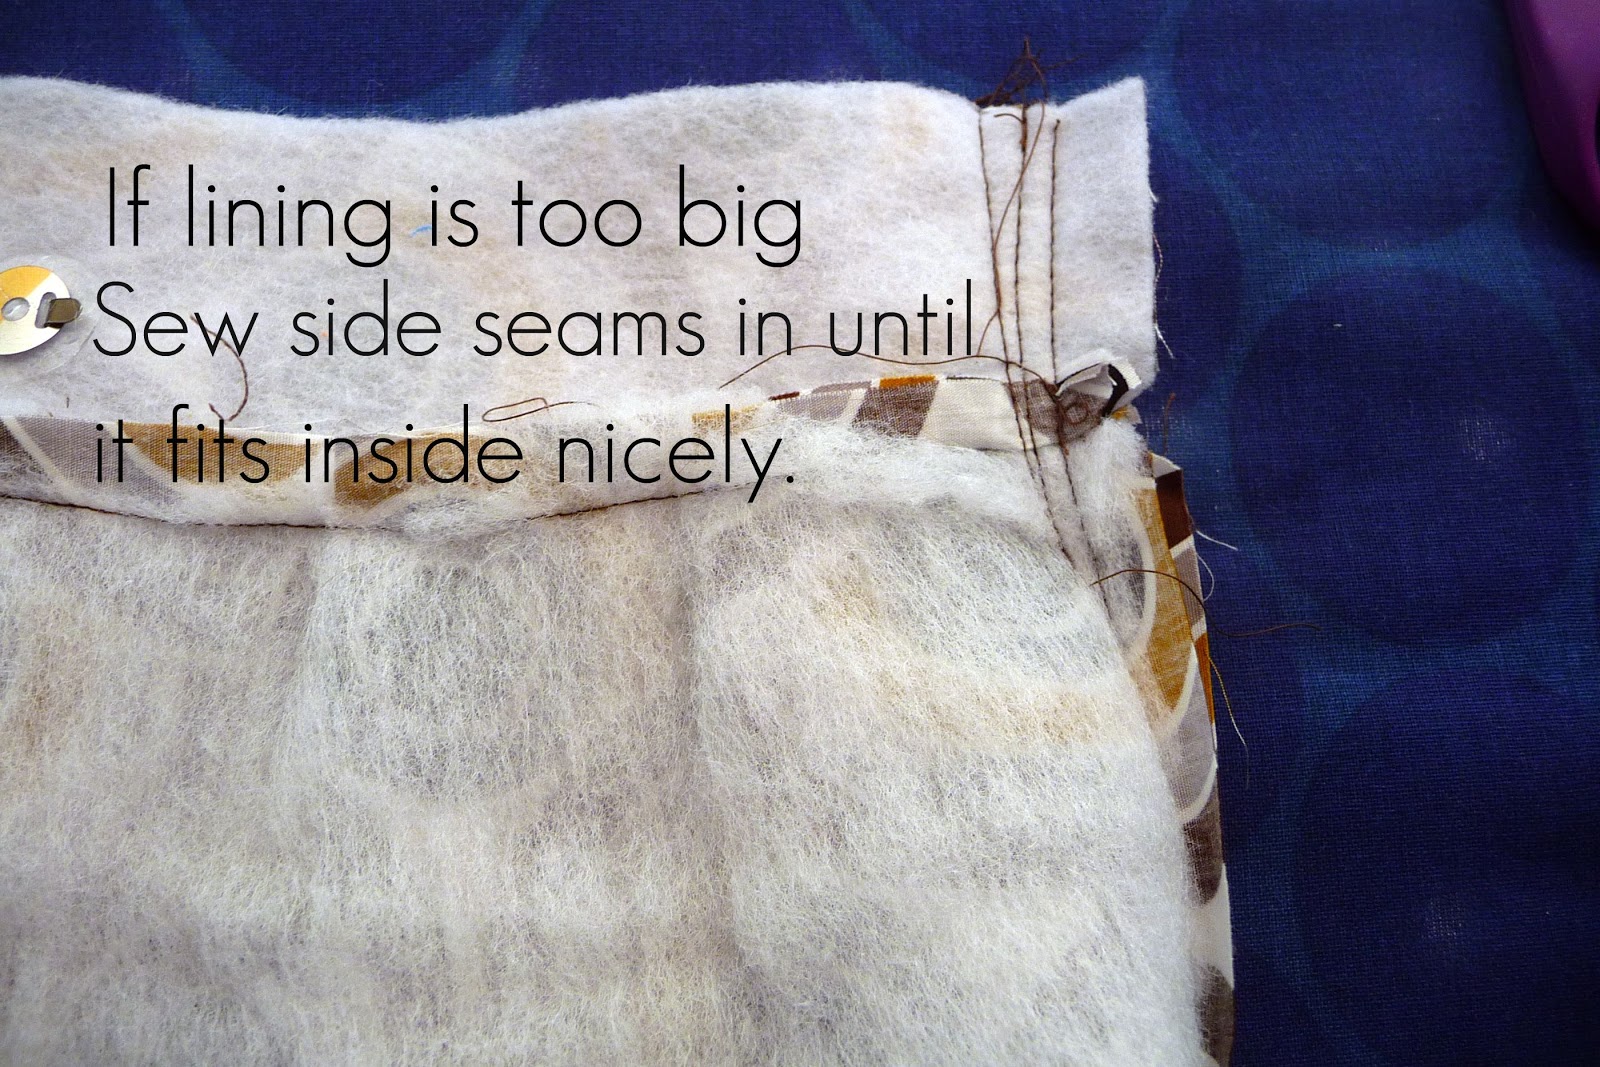
Now to make the lining iron the Fusible Fleece to lining fabric (I used batting 'cause I ran out of the fleece) and pleat the square and ad the yolk as before.

Now it's time to add the pocket. Take your pocket fabric and...


Sew on pocket by topstitching 1/8 inch from the edges.

Next put in your magnetic clasp. Find the center and mark 1-1/2 in down from top.


The stabilizing plastic I used here was a disc cut from Ikea shelf liner, but plastic from the side of a milk jug works well too.


Now make the handle...


And there's a lovely Pleated Bag for you to use or to send to a favorite friend. It would make a great Christmas gift! Enjoy!

Sarah, it looks great!! Thank you so much for taking this on for me. :D I have a hard time critiquing a tutorial until I actually work my way through it. I hope to find some time for it soon, and I can tell you how it went, and share my results with you. :) Thanks again, a million times!!!
ReplyDeleteWhat a gorgeous bag! Thanks so much for sharing, this is going straight on my to do list!
ReplyDeleteThank you so much for the tutorial! Visiting from Boy oh Boy oh Boy. Hope you'll visit me sometime at www.superstinkyboys.blogspot.com!
ReplyDeletexoxo
Ginger
SSB
this is so cute! thanks for sharing - going on my TO DO LIST someday.
ReplyDeleteYour tutorial is great! It is not easy to create pictures that are easy to follow and understand even without reading!
ReplyDeleteAnd I love your little by the side comments :)
Hi Sarah, your tutorial is absolute great! Made this bag - my first one with pleats and it turned out to be gorgeous though I changed a few steps!!! Thanks so much - wish I could post you a pic for your opinion!
ReplyDeleteKeep on posting tutorials - they are great!!!
Susanne
My favorite part of the bag is the handle and I'm so happy with all the instructions. I've made only two bags but the instructions are not as nice as yours. Thank you for sharing your pattern with us. It is so pretty!
ReplyDeleteWhat a great purse and tutorial. I a bit addicted to making bags myself.. found you on Creative Headquarters blog hop!
ReplyDeleteDelightful pleated bags. Excellent tutorial. I can't wait to make these. Your tutorial definitely goes into my list of favorite tutorials. Great job. I'll use some of my dress fabrics in doing this.
ReplyDeleteWorking on one now. Thank you very much, this has been so helpful. The stabilizing plastic I am using is being cut from a disposable chopping mat that I got from the dollar store. I also use them when I need to cut a template for quilting.
ReplyDeleteThat's a great idea to use a chopping mat. Glad the tutorial is helpful. It was the first one ever wrote, Lol! I'd love to see it when you're done.
DeleteI like this one as much as the Buttercup pleated one.
ReplyDelete