Rag Doll Baby Tutorial


I teach music at church for the 3-12 year olds. I'm always trying to figure out a way to make it fun. We needed a little baby prop for a song they were learning so I scoured Pinterest of course to see if I could find a little hanky baby tutorial, or something along those lines. NO luck. Then I called my Mom who happens to be a crafting genius. She dug around in her files and sent me a picture of a Rag Doll pattern that she drew long long ago. It is really so cute but a little more involved than I wanted it to be. So I used the same kind a of design and came up with a super simple baby shape.


Okay it also looks like a ghost, but it worked out perfectly for the little kids to rock their tiny babies as they sang the little lullaby they were learning. Just in case you are curious I'm going to show you how to make these little 6 inch rag doll babies.
I started with  a 12 inch square of Minky or "Cuddle" fabric. Of course you could make them larger if you wanted to, just start with a larger square. Pleat the fabric folding it like an accordion about every inch. Minky fabric has a plush side and a smooth side. You'll want to pleat the fabric so the plush side faces to the front.


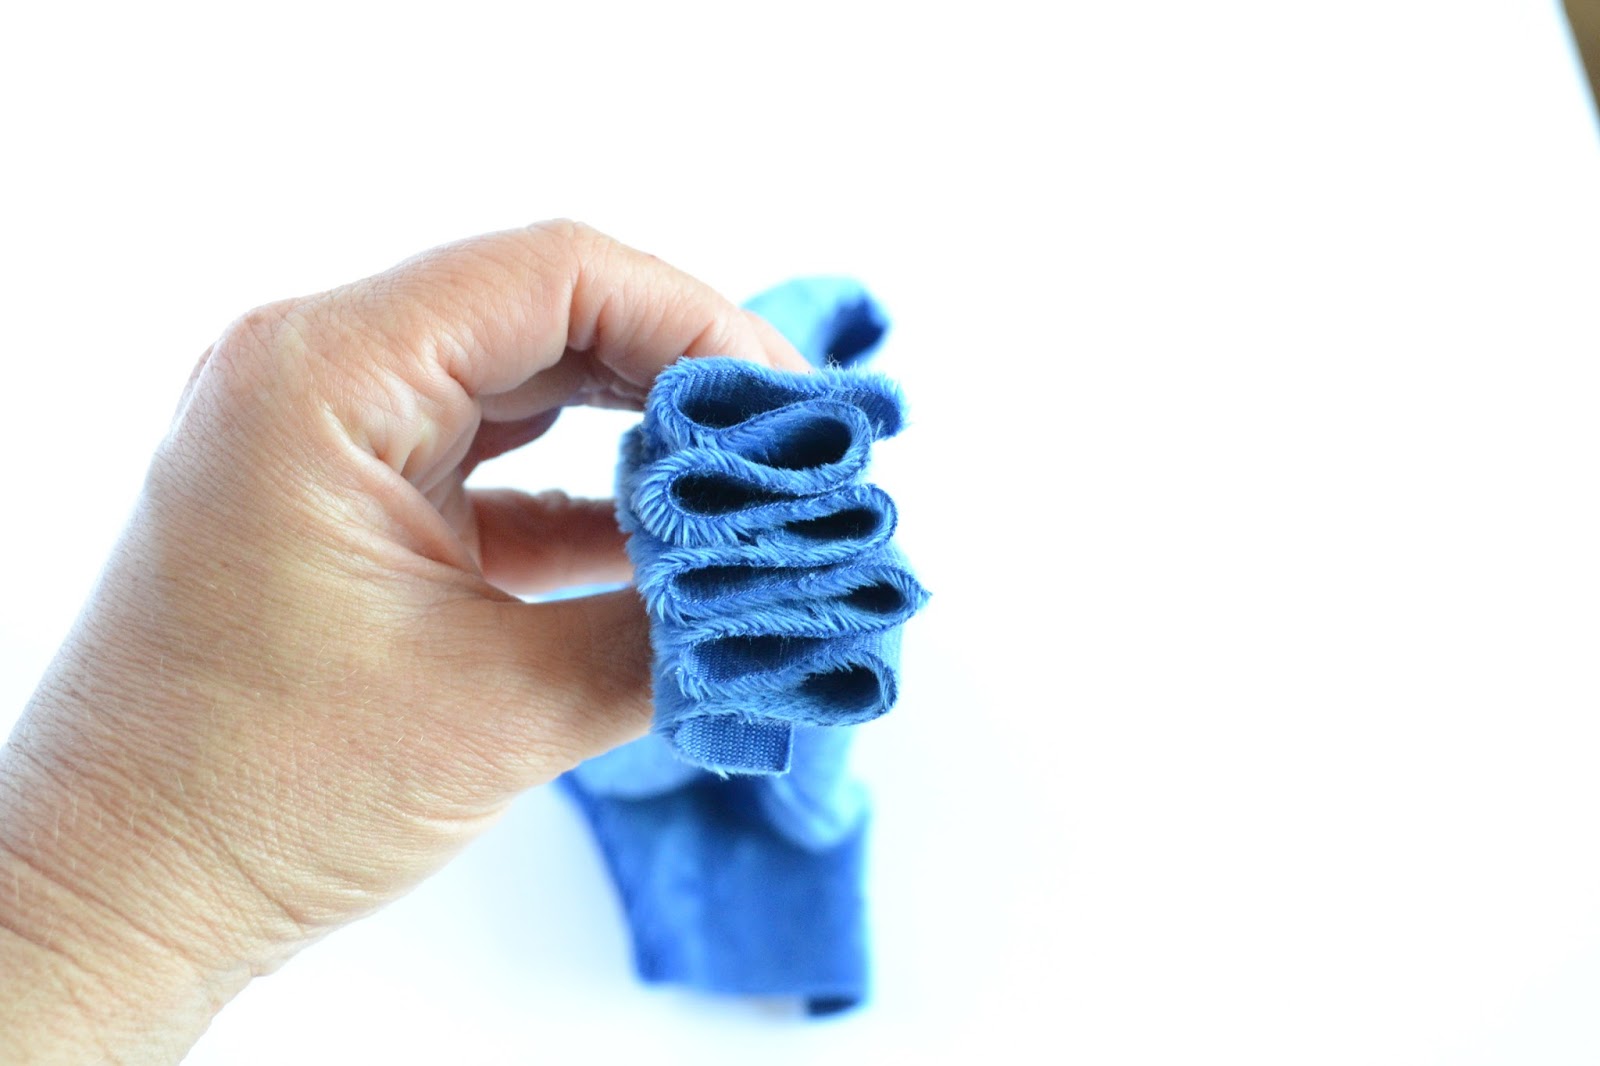
Fold the pleated strip in half. Tie an 8 inch piece of yarn around it about 1 1/2 inches away from the fold to create the head. If you loop the yarn through twice as you are tying your first knot it will stay cinched better.

Make the arms by taking the outermost fold and tucking the end under the tie inside the fold as shown.

Wrap the tails of the yarn around to the back and under each arm to help hold them in place. You could also use a needle and thread to stitch the arms in place if you want them to be more secure.

Tie the strings into a bow in the front.

You could leave it like this or tie the bottom to finish it off like I did.

And there you have it a little bunch of babies to cuddle and rock.


The "Pokey Little Puppy" Retro Romper

Remember my post about how I just like to start projects and am less excited to actually finish them? Well, it's hereditary.  A few months ago my mom sent this cute Poky Little Puppy romper that she had almost finished for my oldest brother 45 years ago. LOL! Anyway it just happens to be the perfect size for Thomas right now.  It only needed buttons so I sewed them on for a quick finish one day.

Thomas loves his "doggy shirt".


I think I may have made the flaps fold forward when they should have been folded to the back. Ooops! I should have consulted with the designer.


I had a lot of fun taking these photos so I'm sharing a bunch of them.

This is his "Where?" look


If you are curious about the little applique, Mom said she had a Pokey Little Puppy toy that she used to trace around for the shape and then just improvised the applique pieces and used her sewing machine to embroider the face. She's always been super creative and resourceful. It would have been fun to read her blog if those existed way back when. If you want to see more of my mom's amazing talent you can visit her Doll Pattern shop where you can see her beautiful doll clothing designs.

Thanks for the cute romper, Mom. I've washed it a bit and that fabric doesn't look a bit different. I thought for sure that red fabric would bleed onto the white, but no!

Happy Sewing Y'all.

Colorful Patchwork Bags and Baskets (Class Review)

Hi sewing friends. Today I'm posting as a part of the Colorful Patchwork Bags and Baskets blog hop at SewCanShe. My friend Caroline recently came up with the cutest pattern and got the chance to film her first *Craftsy class about it.
 Her class is called Colorful Patchwork Bags and Baskets and her patterns are super versatile. Have you ever taken a Craftsy class?  They are so fun and I always learn something new when I watch one. In Caroline's class, she teaches how to make tote bags, zipper pouches, and fabric baskets using a fun and fail proof patchwork technique.  Once you learn the techniques you can make any size bag or basket that you'd like.


Of course I chose to make a bag....of course.

This looks like your typical tote but it isn't. It has options. I chose to make the version that has pockets on the outside which are installed in a very clever way. They are big enough to slip in your favorite novel or anything else you need to keep right at your finger tips.

My favorite part about this pattern is that it uses gridded interfacing by Pellon that makes for super easy patchwork piecing. 

Here's a view of the inside where there are more pockets.

And the fabric on the handles is my favorite.

If you are curious about the fabrics I used:
Patchwork: Priory Square by Katy Jones.
Dot chambray: Robert Kaufman
Plain Denim from Joann

And if you are trying to recreate this very bag I started with 5'' charm squares.

 The tote bag is just one of the projects you can make in this class. Caroline also shows you how to make fabric baskets and zipper pouches in a variety of sizes. Isn't that little tiny pouch so cute?

 Want to checkout this class and see how these cute projects are made? You are in luck! Caroline is generously offering 50% discount to my readers (that means you!). To get the discount, and to watch a preview of the class, click HERE. Remember once you purchase the class you can watch it anytime, and you'll have indefinite access to it through your free Craftsy account.

Be sure to check out the other stops on the blog hop below. New links will appear as the week goes on with a new stop every day.

<!-- inlinkz code end —>

*In full disclosure, this post contains Craftsy affiliate links. I was given a free link to take this class and supplied with some interfacing and supplies to make the cute tote you see above. But, I truly think this is a brilliant pattern and hope you'll try it out. If you do, let me know what you think. 

Happy Sewing!!

Weekend WIPs

Hello friends! I thought it would be fun to check in with a little update of things here at Blue Susan headquarters.

My birthday was a couple of weeks ago and I took the opportunity to head on up to one of my favorite local fabric stores The Quilt Place and browse their amazing selection of quilting fabric. I was happy to find that they are now stocking most of the Cotton and Steel fabric lines. It is so fun to see all that beautiful fabric in real life and not just on Instagram. I came away with this small stack of fabric. treated myself to some new fabric to fill up my sewing closet of course.


 I'm currently reorganizing my sewing closet...again. I'm having a hard time remembering where I put everything so I thought it was time for a little reorganization. I'm finding that there are way more unfinished projects than I think I can handle. Here is the list of sewing projects that I found half done in my closet. There are a few more that I haven't added to the list, like my PLUS quilt.


I have a problem I think. I really just like to start projects. Finishing them is not really as fun as starting them. Actually I've been thinking and I don't think it's bad to just start projects and not finish them.  I like to sew and design for a creative outlet and to escape from everyday life from time to time. Just because I don't finish a project or never sew up the fabric that I buy it doesn't matter, it's the experience that I crave, not holding the finished item in my hand. So I made a list and if I get these projects finished, great!! If not, oh well. Does this make sense?


Anyhow, this little quilt is destined to become a wall hanging for my living room. I spent a bit of time on it on Mother's day treat to myself.  I have it all quilted and it just needs a binding. Yay!! Maybe that will be my treat to myself tomorrow.

Until next time, Happy Sewing!

Quilty Penelope Bag

Hello sewing friends. I get to be the guest designer this month for Patchwork Posse's online Quilt Guild and I'm so excited to share with you the project I've created for it.  I've added a little "quilty" flare to my Penelope handbag and turned it into a PDF pattern to share. Introducing the Quilty Penelope Bag.

The handbag has a Variable star built into the side panels, giving it a pop of color and a cute way to show off your love of quilting. The star panel is great for using up some of your scraps or for playing around with your new favorite fabrics. You can also substitute an 8”, or larger, orphan block to the center panel for a completely different look.


 The Quilty Penelope Bag is perfect for carrying all your essentials, plus a few extras. It’s small enough that it won’t weigh down your shoulder, but roomy enough to hold what you need. 

There are pockets on the inside and a simple magnetic snap closure. The comfortable fabric strap stays on your shoulder and easily slips on with one hand. 

This pattern is written exclusively for Patchwork Posse's online Quilt Guild. Are you a member yet? You may want to consider joining. Not just for my pattern but for access to all the other exclusive patterns, tutorials, Block-of-the-Months, and giveaways that come along with membership. 
There's also a facebook group where you can show of your projects and get feedback and fun swaps you can participate in. It's just like being part of a local quilt group but with the convenience of your own schedule. You'll find all the details about how to join on the Quilt Guild Info Page 
You can read more about me and my project on the Guest Designer page. Sign up and download my Quilty Penelope Bag pattern and let me know what you think.
Happy Sewing!

Making Christmas


Now that the packages are all sent and the presents shopping is done (mostly), for us these last few days before Christmas are all about keeping the kids busy, cleaning up the house, and planning meals.

Yesterday we did a fun craft from with some friends using the Yarn Wrapped Ornament tutorial from the Inspired Treehouse. We cut, taped, wrapped yarn, made a mess, and it was fun. Of course a box of donut holes made it a little extra fun too.

I love how they all turned out! Now tonight's job is to tackle the 5 pair of Christmas jammie pants I have waiting for me in my sewing closet. Wish me luck. Are you having fun making Christmas too?

Mini Tulip Tote Winner

Hello there! I'm just checking in to announce our Mini Tulip Tote Winner from the Sew Mama Sew giveaway day.
And the winner is LeeAnna Paylor!! I'm sending your pattern today!! Thank you to all who entered the giveaway.  If you aren't a winner the PDF Pattern is still available in the Etsy Shop along with 1 more sample bag that's still up for grabs.

Also I received a lovely email recently from Melinda Burch showing off this lovely Mini Tulip Tote she sewed. You can find her at Sew Good To Be Home on Facebook.


She got creative and figured out how to insert a zipper into the top. Way to go Melinda!

That's all for now. Back to Christmas shopping and prep. Happy Holidays!